# Validating forms in Flutter
Source: https://iiro.dev/validating-forms-in-flutter/
Published: 2017-10-17
Learn how Flutter form validation works, with a quick comparison to a similar Android implementation.
---
Coming from a native mobile development background, form validation has definitely been a pet peeve of mine. It's not that validating forms is hard, but the thing is that it usually results in awkward looking code. Getting references to fields, finding out their values, validating them and manually displaying and hiding errors becomes cumbersome really fast.
With Flutter, form validation is much more enjoyable to work with. Let's take a look why.
### The sample app
[See the sample app here](https://github.com/FlutterRocks/form-validation-sample).
## Validating forms - the "old" Android way
To put things on perspective, let's look at a typical form validation setup in a native Android development context.
This is the method you'll most likely stumble upon in most Android codebases. To start, first we have to define the XML layout.
**File:** `activity_login.xml`
```xml
```
This is your standard Android XML layout for a simple login UI. It uses the `TextInputLayout` and `TextInputEditText` from the [design support library](https://developer.android.com/topic/libraries/support-library/packages.html#design) for displaying error labels below the text fields on error cases.
**File:** `LoginActivity.kt`
```kotlin
package rocks.flutter.validatingformsandroid
import android.os.Bundle
import android.support.v7.app.AppCompatActivity
import android.widget.Toast
import kotlinx.android.synthetic.main.activity_login.*
class LoginActivity : AppCompatActivity() {
override fun onCreate(savedInstanceState: Bundle?) {
super.onCreate(savedInstanceState)
setContentView(R.layout.activity_login)
submitButton.setOnClickListener {
if (validate()) {
performLogin()
}
}
}
private fun validate(): Boolean {
// Reset errors in UI
emailInputLayout.error = null
passwordInputLayout.error = null
var hasErrors = false
val email = emailInput.text.toString()
val password = passwordInput.text.toString()
if (!email.contains("@")) {
emailInputLayout.error = "Not a valid email."
hasErrors = true
}
if (password.length < 6) {
passwordInputLayout.error = "Password too short."
hasErrors = true
}
return !hasErrors
}
private fun performLogin() {
val email = emailInput.text.toString()
val password = passwordInput.text.toString()
val message = "Logging in with $email and $password"
// Not really logging in for demo purposes ¯\_(ツ)_/¯
Toast.makeText(this, message, Toast.LENGTH_LONG).show()
}
}
```
First, we attach an `OnClickListener` to the submit button. The listener first checks if the email is valid according to our rules. In our case, simply "@" character being present is enough. Then we make sure that the password is long enough, which in our case is a minimum of 6 characters.
If all is well, the `validate()` method returns true and `performLogin()` gets called. Otherwise we display errors below the faulty text fields and prevent sending the form.
## Validating forms - the Flutter way
The UI markup for the Android sample above took *45 lines of code*. The Kotlin part is 50 lines long, which makes the Android sample take a total of **95 lines of code**.
Let's look at what it takes to implement the same result in Flutter.
### The Form & FormField widgets
To validate our text fields easily, we'll have one [Form widget](https://docs.flutter.io/flutter/widgets/Form-class.html) that can contain multiple [TextFormField widgets](https://docs.flutter.io/flutter/material/TextFormField-class.html). If we had a text field for a _username input_, we would do something like this:
```dart
class Example extends StatefulWidget {
@override
State createState() => _ExampleState();
}
class _ExampleState extends State {
final formKey = GlobalKey();
String? _username;
@override
Widget build(BuildContext context) {
return Form(
key: formKey,
child: TextFormField(
decoration: InputDecoration(labelText: 'Username'),
validator: (val) => val!.isEmpty ? 'Username cannot be empty.' : null,
onSaved: (val) => _username = val,
),
);
}
}
```
There's two interesting things here: the _validator_ and _onSaved_ parameters.
* a _validator_ is a method that receives the current value of the field when [FormFieldState#validate](https://docs.flutter.io/flutter/widgets/FormFieldState/validate.html) is called. It should return either an error string or null, depending on whether the field is valid or not.
* similarly, the _onSaved_ parameter receives the current value of the field when [FormFieldState#save](https://docs.flutter.io/flutter/widgets/FormFieldState/save.html) is called. This value should be saved somewhere, usually in an instance field of our state, like in the example above.
You might notice that we passed a _key_ to our Form widget. Keys could probably be a topic on their own, but to put it simply, think of them as _unique identifiers_ that we can use to get a reference to our widgets.
So, in our case, when we need to validate and submit our form, we can do it like this:
```dart
final form = formKey.currentState;
if (form.validate()) {
form.save();
// Form is saved, perform the login now.
}
```
Calling [FormState#validate()](https://docs.flutter.io/flutter/widgets/FormState/validate.html) loops through _every FormField widget_ contained in our Form, and calls the `validator` methods on each of them. If there's any errors, they're displayed accordingly in the UI.
Similarly, calling [FormState#save()](https://docs.flutter.io/flutter/widgets/FormState/save.html) also loops through _every FormField widget_ inside the Form, but calls the `onSaved` methods instead. After calling it, we can use the fields for our API calls and what not.
Let's see how the previous native Android form validation example would be created in Flutter:
**File:** `login_page.dart`
```dart
class LoginPage extends StatefulWidget {
@override
_LoginPageState createState() => _LoginPageState();
}
class _LoginPageState extends State {
final _scaffoldKey = GlobalKey();
final _formKey = GlobalKey();
String? _email;
String? _password;
void _submit() {
final form = _formKey.currentState!;
if (form.validate()) {
form.save();
// Email & password matched our validation rules
// and are saved to _email and _password fields.
_performLogin();
}
}
void _performLogin() {
// This is just a demo, so no actual login here.
final snackbar = SnackBar(
content: Text('Email: $_email, password: $_password'),
);
_scaffoldKey.currentState!.showSnackBar(snackbar);
}
@override
Widget build(BuildContext context) {
return Scaffold(
key: _scaffoldKey,
appBar: AppBar(
title: Text('Validating forms'),
),
body: Padding(
padding: const EdgeInsets.all(16.0),
child: Form(
key: _formKey,
child: Column(
children: [
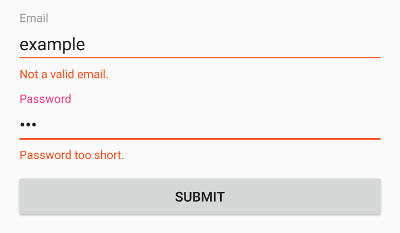
TextFormField(
decoration: InputDecoration(labelText: 'Email'),
validator: (val) =>
!val!.contains('@') ? 'Not a valid email.' : null,
onSaved: (val) => _email = val,
),
TextFormField(
decoration: InputDecoration(labelText: 'Password'),
validator: (val) =>
val!.length < 6 ? 'Password too short.' : null,
onSaved: (val) => _password = val,
obscureText: true,
),
RaisedButton(
onPressed: _submit,
child: new Text('Login'),
),
],
),
),
),
);
}
}
```
The Flutter equivalent is **69 lines of code**. And contrary to the Android example, it works on iOS too. So, in addition to reducing LOC with 26 lines, our app is also cross-platform. How about that!
If you missed it, the source code for a [sample app is here](https://github.com/FlutterRocks/form-validation-sample).