Separating build environments in Flutter apps
When developing mobile apps professionally, we’ll need to have at least two different environments: a development and a production one. This way we can develop and test new features in the development backend, without accidentally breaking anything for the production users.
Currently, the official Flutter documentation doesn’t have any recommendations on how to do this. Like usual, a quick Google search is your friend. It turns out we can do some StackOverflow driven programming.
Some guy called Seth Ladd had the same problem as we do:
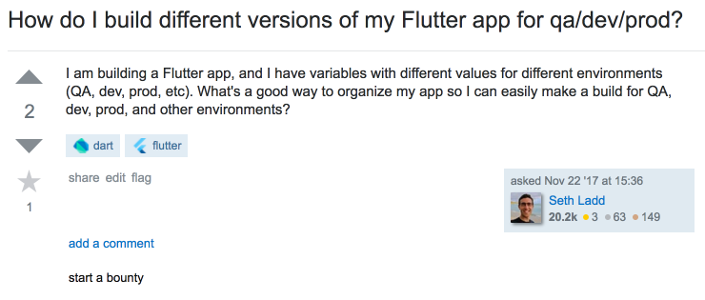
Only 3 minutes later, another Seth Ladd, with a striking resemblance to the first Seth, came to rescue with this answer:
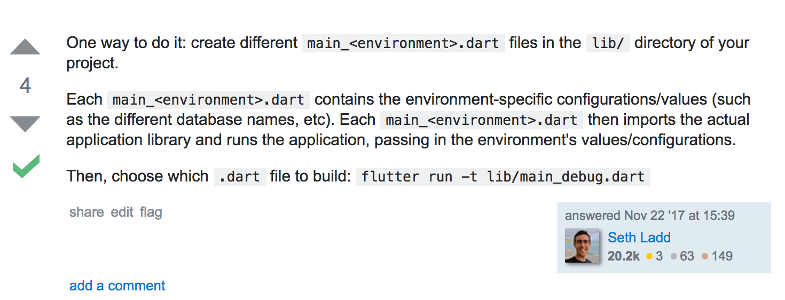
What a quick yet detailed answer in such a short time. This saves us some time having to figure it out ourselves. So let’s try to do this environment split the way Seth suggests.
(In case you don’t know who Seth is, he’s a product manager at Google working on Flutter, and he’s an awesome guy.)
The sample project
You can find the full source code for the sample project here.
The initial app
As usual, let’s take a look at a sample app and how to introduce different environments to it.
import 'my_home_page.dart';

void main() => runApp(MyApp());

class MyApp extends StatelessWidget {
  @override
  Widget build(BuildContext context) {
    return MaterialApp(
      title: 'Build flavors',
      theme: ThemeData(
        primarySwatch: Colors.blue,
      ),
      home: MyHomePage(),
    );
  }
}
The main.dart file is basically the default one that Flutter provides when starting a new project.
class MyHomePage extends StatefulWidget {
  @override
  _MyHomePageState createState() => _MyHomePageState();
}

class _MyHomePageState extends State<MyHomePage> {
  @override
  Widget build(BuildContext context) {
    return Scaffold(
      appBar: AppBar(
        title: Text('Build flavors'),
      ),
      body: Center(
        child: Column(
          mainAxisAlignment: MainAxisAlignment.center,
          children: [
            // Every value is hardcoded in the app.
            // No development or production variants exist yet.
            Text('This is the production app.'),
            Text('Backend API url is https://api.example.com/'),
          ],
        ),
      ),
    );
  }
}
The my_home_page.dart file is only slightly modified from the default project template.
Splitting the app into two environments
Our app is currently production only - there’s no way of providing values for a development environment. Let’s change that. We’ll have two different environments: development and production.
Here we have a couple of places we’d like to have different behavior depending on the current environment:
- the app bar title:
Build flavors DEVin development environment,Build flavorsin production - the first text widget:
This is the development appin development environment,This is the production appin production - the second text widget:
Backend API url is https://dev-api.example.com/in the development environment,Backend API url is https://api.example.com/in production.
It makes sense to create a new class that holds all environment-specific configuration information.
Creating the configuration object
Let’s create a new Dart file called app_config.dart. It will hold all the environment-dependent information for us.
In our case, we’ll end up something like this:
class AppConfig {
  AppConfig({
    required this.appName,
    required this.flavorName,
    required this.apiBaseUrl,
  });

  final String appName;
  final String flavorName;
  final String apiBaseUrl;
}
You might be asking how to provide this new configuration information to our app. Some of you know the answer already. The InheritedWidget makes obtaining the configuration object from anywhere stupidly easy.
Converting the AppConfig to an InheritedWidget
To make our AppConfig class to be an InheritedWidget, we’ll extend the InheritedWidget class, provide a static of method for obtaining the instance and finally, override the updateShouldNotify method.
import 'package:meta/meta.dart';

class AppConfig extends InheritedWidget {
  AppConfig({
    required this.appName,
    required this.flavorName,
    required this.apiBaseUrl,
    required Widget child,
  }) : super(child: child);

  final String appName;
  final String flavorName;
  final String apiBaseUrl;

  static AppConfig? of(BuildContext context) {
    return context.dependOnInheritedWidgetOfExactType<AppConfig>();
  }

  @override
  bool updateShouldNotify(InheritedWidget oldWidget) => false;
}
Couple things worth noting here:
- the
childconstructor argument will be our entireMaterialAppinstance. We wrap our app with theAppConfigobject. - we created a static method called
of. This is the usual convention forInheritedWidgets. It enables us to callAppConfig.of(context)to obtain our environment-specific config whenever we need it. - in the
updateShouldNotifymethod, we just return false. This is because ourAppConfigwon’t ever change after we’ve created it.
Next, let’s create the files for our two environments.
Creating launcher files for the different environments
We’ll create so-called “launcher files” for each of the environments. In our case, we have only two environments, development and production, so our files will be main_dev.dart and main_prod.dart.
In each file, we’ll create an instance of the AppConfig class with the appropriate configuration data. We pass the new instance of MyApp to our AppConfig widget so that any widget in our app can obtain the instance of the configuration easily. Then, we’ll call runApp which will be the entry point for our entire app.
void main() {
  var configuredApp = AppConfig(
    appName: 'Build flavors DEV',
    flavorName: 'development',
    apiBaseUrl: 'https://dev-api.example.com/',
    child: MyApp(),
  );

  runApp(configuredApp);
}
Nothing special here. We just create a configured app instance with our environment specific configuration data, then call runApp with the configured app as the argument to actually launch it.
void main() {
  var configuredApp = new AppConfig(
    appName: 'Build flavors',
    flavorName: 'production',
    apiBaseUrl: 'https://api.example.com/',
    child: new MyApp(),
  );

  runApp(configuredApp);
}
The production app launcher file is exactly the same as the development one, but with different configuration values.
// We can remove this line here:
// void main() => runApp(new MyApp());

class MyApp extends StatelessWidget {
  @override
  Widget build(BuildContext context) {
    // Call AppConfig.of(context) anywhere to obtain the
    // environment specific configuration
    var config = AppConfig.of(context)!;

    return MaterialApp(
      title: config.appName,
      theme: ThemeData(
        primarySwatch: Colors.blue,
      ),
      home: MyHomePage(),
    );
  }
}
Here we’re just obtaining the app configuration instance and setting our MaterialApp title correctly according to our current environment. We removed the void main() => runApp(new MyApp()) line, since our environment-specific launcher files will cover that.
Since our entire app is wrapped in the AppConfig widget (which extends InheritedWidget), we can obtain the instance of the configuration anywhere by calling AppConfig.of(context). This works even from several widgets deep.
class MyHomePage extends StatefulWidget {
  @override
  _MyHomePageState createState() => _MyHomePageState();
}

class _MyHomePageState extends State<MyHomePage> {
  @override
  Widget build(BuildContext context) {
    var config = AppConfig.of(context)!;

    return Scaffold(
      appBar: AppBar(
        title: Text(config.appName),
      ),
      body: Center(
        child: Column(
          mainAxisAlignment: MainAxisAlignment.center,
          children: [
            Text('This is the ${config.flavorName} app.'),
            Text('Backend API url is ${config.apiBaseUrl}'),
          ],
        ),
      ),
    );
  }
}
Our homepage widget is basically the same as before, but with environment specific values. Like before, we obtained the instance of the AppConfig object by calling AppConfig.of(context).
Running the app in different environments
Like that Seth Ladd guy answered in the StackOverflow question, we can run the different variants by running flutter run with the --target or -t argument for short.
So, in our case:
- to run the development build, we call
flutter run -t lib/main_dev.dart - to run the production build, we call
flutter run -t lib/main_prod.dart
To create a release build on Android, we can run flutter build apk -t lib/main_<environment>.dart and we will get the correct APK for our environment. To do a release build on iOS, just replace apk with ios.
While this is pretty simple, wouldn’t it be nice if there’s some IDE option to toggle between different variants?
Creating environment-specific Run Configurations in IntelliJ IDEA / Android Studio
If you’re using Android Studio or IntelliJ IDEA with the Flutter Plugin, it’s easy to create the run configurations needed to run our separate environments.
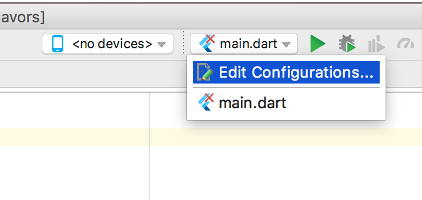
First, click Edit Configurations in the drop-down menu right next to the run button.
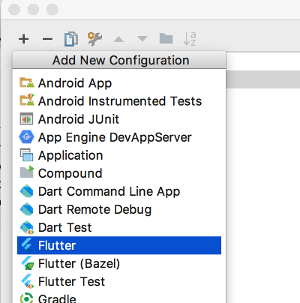
Then, click the + button to create a new run configuration. Select Flutter in the list.
For the development variant, enter dev as the name. To include this run configuration in version control for your coworkers, make sure to check the Share checkbox.
Then, select the lib/main_dev.dart file for the Dart entrypoint.

We’re done! Repeat the same steps for your production variant.
If you did everything correctly, here’s what you should have now:
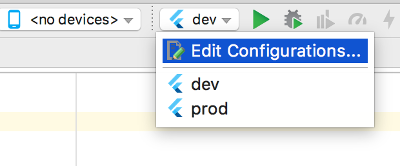
Lastly, remove the main.dart run configuration by clicking Edit Configurations and pressing the - button while having main.dart selected.
Conclusion
Having different environments is a must in professional app development. Thankfully, Dart and Flutter make it relatively simple. In the next part, we’re looking into how to split your projects in the Android & iOS side. This can be useful if you use Firebase and need different google-services.json and GoogleService-Info.plist files based on different environments.
If you missed it, the source code can be found here.
15 comments
likes