Clipping widgets with bezier curves in Flutter
Hello World!
This is the very first post on flutter.rocks, a blog by two developers with different backgrounds. We’ll take you through our journey of using Flutter to create cross-platform mobile applications. We’ll also share our best tips, tricks and useful guides along the way. If this sounds something you would be interested in reading more about, be sure to subscribe at the bottom of the page.
Without further ado, we are kicking the blog off with a technical post, where we look into clipping images with Bezier curves.

I was browsing UpLabs when I stumbled upon this Walkthrough Coffeeshop App UI by Dual Pixel. The wavy image is the part that caught my interest. Having created something similar just a couple days ago for my hobby Flutter project, this was the perfect idea for our first post on the blog. So let’s get into it.
Source code
The source of the complete result is here.
The implementation
First, create a new Flutter project. Let’s call this one wavy_image_mask. Assuming you have Flutter installed, run flutter create wavy_image_mask on your terminal. Open the project on IntelliJ IDEA.
Let’s create a new StatelessWidget called WavyHeaderImage. Create a new Dart file called wavy_header_image.dart. Place it in the lib folder where our app code resides. For now, we’ll just return a placeholder Text widget from the build method:
class WavyHeaderImage extends StatelessWidget {
  @override
  Widget build(BuildContext context) {
    return Text('This is where our image will be.');
  }
}
Return to the main file. Remove all the sample code Flutter generates for you, and replace the Scaffold body with the WavyHeaderImage we just created. You should end up with the following code:
import 'wavy_header_image_unimplemented.dart';

void main() => runApp(MyApp());

class MyApp extends StatelessWidget {
  @override
  Widget build(BuildContext context) {
    return MaterialApp(
      title: 'Wavy image mask',
      theme: ThemeData(
        primarySwatch: Colors.blue,
      ),
      home: MyHomePage(),
    );
  }
}

class MyHomePage extends StatefulWidget {
  @override
  _MyHomePageState createState() => _MyHomePageState();
}

class _MyHomePageState extends State<MyHomePage> {
  @override
  Widget build(BuildContext context) {
    return Scaffold(
      body: WavyHeaderImage(),
    );
  }
}
Creating the header image
Now we’ll need a nice looking header image. We’ll use this one from Chevanon Photography.
It’s a little too big for our needs, so here’s a smaller one.
Adding assets in Flutter
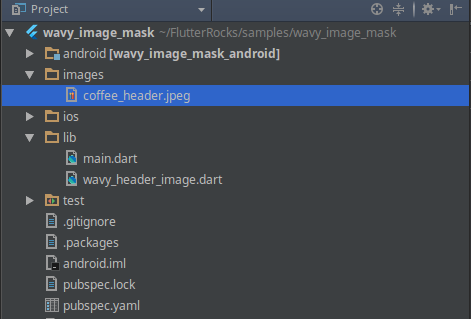
To include images or files in general, we use Flutter’s asset system. Create a folder called images in the root of your app. Add the coffee_header.jpeg you just downloaded inside of it. Your folder structure should now look like this:

In order to make the image available to our code, we’ll also need to include an assets section inside of our flutter section in the pubspec.yaml file. So our pubspec file should now look something like this:
name: wavy_image_mask
description: A new Flutter project.

dependencies:
  flutter:
    sdk: flutter

dev_dependencies:
  flutter_test:
    sdk: flutter

flutter:
  uses-material-design: true
  assets:
    - images/coffee_header.jpeg
Now we can use the image in our app.
Making some waves
One, naive way of creating the wave mask would be asking a designer to just edit the original image with Photoshop. We could also ask for a transparent image that has the waves drawn with white color. Then we’d just slap that on top of the image, position it on the bottom and call it a day.
A better way of doing that is clipping the wavy parts of the image ourselves. This solution will look better on different screen sizes. We also don’t need to include an extra wave overlay image in our assets. Thanks to a nice set of graphics related APIs in Flutter, we can do this very easily.
Using ClipPaths
The class we’re going to use for creating the wave shape on the bottom is the ClipPath widget. ClipPath needs two arguments: a clipper and a child. The clipper is a CustomClipper<Path> object that determines a Path. This path is used by the ClipPath widget for preventing the child painting anything outside the path.
Reopen the wavy_header_image.dart we created at the very beginning. Remove the placeholder Text widget and replace that with a ClipPath.
The child parameter is new Image.asset('images/coffee_header.jpeg'). This simply loads our image from the images folder and displays it. For clipper, we’re just going to say new BottomWaveClipper(). We’ll also need to create a new class for the BottomWaveClipper, which we’ll have in the same file.
This is what we should have at this point:
class WavyHeaderImage extends StatelessWidget {
  @override
  Widget build(BuildContext context) {
    return ClipPath(
      child: Image.asset('images/coffee_header.jpeg'),
      clipper: BottomWaveClipper(),
    );
  }
}

class BottomWaveClipper extends CustomClipper<Path> {
  @override
  Path getClip(Size size) {
    // This is where we decide what part of our image is going to be
    // visible. If you try to run the app now, nothing will be shown.
    return Path();
  }

  @override
  bool shouldReclip(CustomClipper<Path> oldClipper) => false;
}
Now we can get to the fun part.
Drawing the path
All CustomClippers get a size parameter in their getClip method. This size represents the width and height of the child passed to the ClipPath object. In our case, it’s the coffee image we want to clip. Since our CustomClipper uses paths for determining the clip, we use methods from the Path class for drawing the clip.
So, for example, if we want to clip the bottom right part of our image diagonally out, we’d end up something like this:
@override
Path getClip(Size size) {
  var path = Path();

  // Draw a straight line from current point to the bottom left corner.
  path.lineTo(0.0, size.height);

  // Draw a straight line from current point to the top right corner.
  path.lineTo(size.width, 0.0);

  // Draws a straight line from current point to the first point of the path.
  // In this case (0, 0), since that's where the paths start by default.
  path.close();
  return path;
}
Since we don’t want to clip out anything other than the wave at the bottom, we’ll add path.lineTo(size.width, size.height); right before drawing a line to the top right corner. This modification returns the image as is, without any clipping, but sets us up for actually clipping the wavy part out.
Now that we learned how to clip by drawing straight lines with our path, let’s draw the waves. Since the bottom of the wave goes vertically below the first point on bottom left corner, we’ll have to move that point a little higher. Similarly, the bottom right point is also a little higher than the bottom left one.
@override
Path getClip(Size size) {
  var path = Path();

  // Since the wave goes vertically lower than bottom left starting point,
  // we'll have to make this point a little higher.
  path.lineTo(0.0, size.height - 20);

  // TODO: The wavy clipping magic happens here, between the bottom left and bottom right points.

  // The bottom right point also isn't at the same level as its left counterpart,
  // so we'll adjust that one too.
  path.lineTo(size.width, size.height - 40);
  path.lineTo(size.width, 0.0);
  path.close();
}
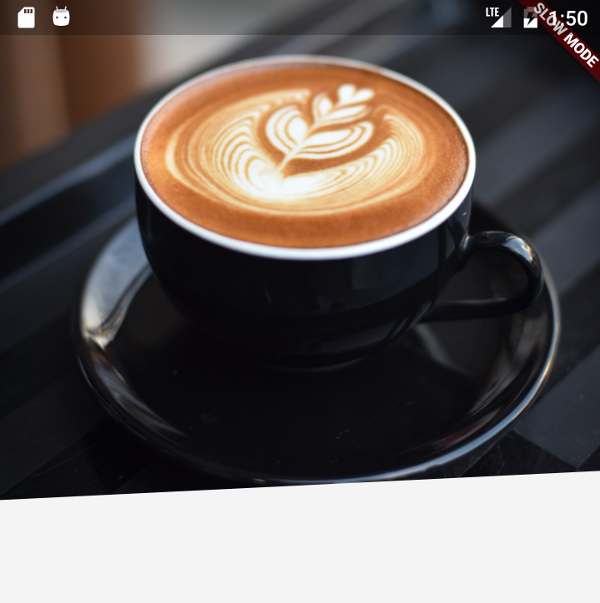
This creates a slight clipped angle in the bottom part of the image. Here’s how it should look now:

What’s a quadratic bezier?
Now we can actually finally implement the waves. To do so, we use the quadraticBezierTo method. Quadratic beziers allow us to easily create curves on our paths.
The API is pretty similar to the lineTo method, but instead of giving one coordinate, we give two. One for our end destination, other for a so called control point.
Basically, we just draw a straight line to our destination, and the control point acts like a magnet. It pulls the middle of our path to its direction and distorts our straight line into a curve.
Determining the end & control points
In our case, we need to draw two quadratic beziers. The control point for the first line should drag the middle of the line down. Similarly, the control point for the second line should drag the middle of the line up.
If we look at the mockup, the first line doesn’t exactly end horizontally at the center. Likewise, the second line is a little bit longer than half of the width of the image.
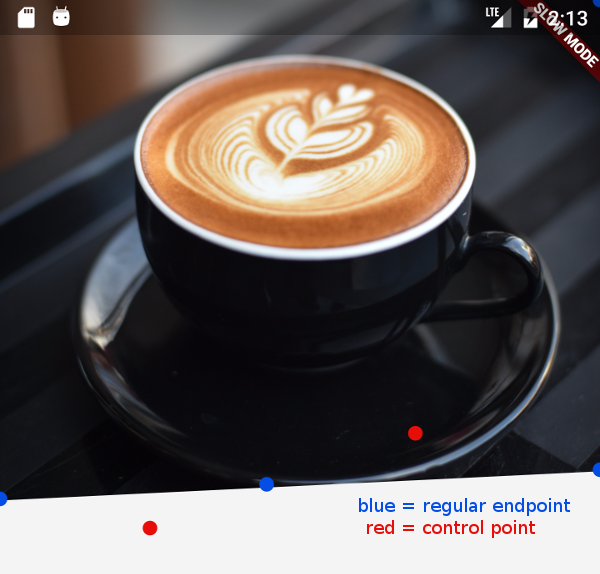
Based on our knowledge so far, we want to align our points and control points something like this:

You might look at that and say “those curves are way too big!” and you’re right. However, those red control points are not where our curved line will touch, but they’ll merely attract the line like a magnet. The end result will actually look pretty close to the mockup.
The first curve
These are the facts we know about the first curve:
- the endpoint is horizontally a little under the center
- the endpoint is vertically a little higher than the starting point
- the control point is horizontally at one fourth of the image width
- the control point is vertically at the bottom of the image
Based on these facts, the first bezier looks like this:
final firstControlPoint = Offset(size.width / 4, size.height);
final firstEndPoint = Offset(size.width / 2.25, size.height - 30.0);
path.quadraticBezierTo(firstControlPoint.dx, firstControlPoint.dy,
    firstEndPoint.dx, firstEndPoint.dy);
We could just skip creating the Offset objects and just use the x & y coordinates directly, but this is just to make it more readable. This way, it’s easier to see what the parameters to quadraticBezierTo method are on a first glance.
The second curve
Here are the facts of the second curve:
- the endpoint is horizontally at the right edge of the image
- the endpoint is vertically a little higher than the endpoint of the first curve
- the control point is horizontally little below 3/4 of the image width
- the control point is vertically about 20 pixels or so above the endpoint
With a little trial and error, this is what we get for the second curve:
var secondControlPoint =
    Offset(size.width - (size.width / 3.25), size.height - 65);
var secondEndPoint = Offset(size.width, size.height - 40);
path.quadraticBezierTo(secondControlPoint.dx, secondControlPoint.dy,
    secondEndPoint.dx, secondEndPoint.dy);
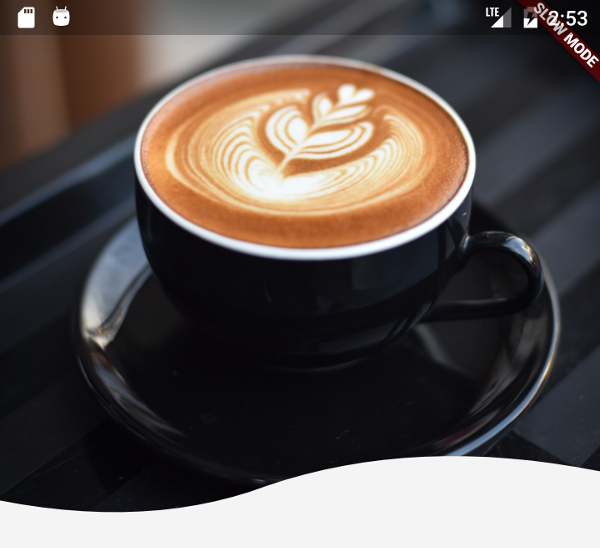
And we’re done! If you did everything right, the end result should look like this:

Here’s the complete code for the WavyHeaderImage widget:
class WavyHeaderImage extends StatelessWidget {
  @override
  Widget build(BuildContext context) {
    return ClipPath(
      child: Image.asset('images/coffee_header.jpeg'),
      clipper: BottomWaveClipper(),
    );
  }
}

class BottomWaveClipper extends CustomClipper<Path> {
  @override
  Path getClip(Size size) {
    var path = Path();
    path.lineTo(0.0, size.height - 20);

    var firstControlPoint = Offset(size.width / 4, size.height);
    var firstEndPoint = Offset(size.width / 2.25, size.height - 30.0);
    path.quadraticBezierTo(firstControlPoint.dx, firstControlPoint.dy,
        firstEndPoint.dx, firstEndPoint.dy);

    var secondControlPoint =
        Offset(size.width - (size.width / 3.25), size.height - 65);
    var secondEndPoint = Offset(size.width, size.height - 40);
    path.quadraticBezierTo(secondControlPoint.dx, secondControlPoint.dy,
        secondEndPoint.dx, secondEndPoint.dy);

    path.lineTo(size.width, size.height - 40);
    path.lineTo(size.width, 0.0);
    path.close();

    return path;
  }

  @override
  bool shouldReclip(CustomClipper<Path> oldClipper) => false;
}
The complete source can be found here.
12 comments
likes